
Today I’m sharing all my bread secrets. Bread, but rather unlike the stuff we eat now, was the staple food of the Regency, for the poor in the form of the quartern (four pound) loaf. The Corn Laws, protecting landowners from foreign imports of grain, caused the price of bread to rise dramatically and created much hardship.
Bread in its basic form is yeast, flour, salt, and water. That’s it. Regency yeast would have been skimmed from frothy nasty stuff in beermaking or a form of sourdough from a baker. It would not have had much rising power and the wheat was a soft (i.e. low in gluten) variety so the bread would have been rather solid. Bread takes a hot oven and most poor people bought bread, not owning the fuel or a suitable oven to bake it, thus putting them at the mercy of ever-rising prices.
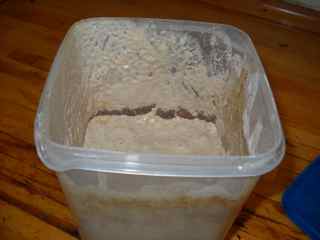 I use a sourdough and here it is. Looks disgusting, doesn’t it. By the way, sourdough is very easy to make and maintain. I read all sorts of dreadful rubbish online about the complexities and terror of sourdough, but here’s the dumb easy way: 2 cups flour, 2 cups water, half Tbsp. yeast. Mix. Let it stand loosely covered (rogue yeast in the air will come a-courting). Stir and take out a cup or so every day, add an equivalent amount of water and flour. After a week transfer it to the refrigerator where it will need a stir and feed weekly. It will go on indefinitely, smelling like beer and producing thin brown liquid (alcohol) and sometimes a rather revolting skin. Some sourdoughs are very old. Mine is only a month or so old.
I make a lot of bread so I don’t usually measure but generally 1 Tbsp yeast to 2 C liquid makes a couple of loaves. I use the sponge method, where you start off with the elements–yeast, water, sugar (not essential but cheers up the yeast). Myth #1: you don’t need to bring your liquid to a boil and let it cool, even if using milk–milk is all pasteurized now. You don’t even have to warm it, but again, it keeps the yeast happy. Myth #2: you must keep everything warm. Cold slows down the yeast but it’s heat that kills it, which is what happens when you bake–otherwise it would eat the oven.
It is a time consuming process but consider this–you can let bread rise overnight, or during the day in the refrigerator. You can freeze dough and bring it back to life at room temperature. It’s very forgiving. I started yesterday’s bread at 4:30 and it was cooked ten hours later but that’s because my sourdough does not work fast. You can make a whole bunch of dough and store it in the refrigerator, where its flavor will improve, and cook it up as you need it.

 Since sourdough takes a long time to prove (raise the bread dough) I usually toss in a little yeast, about half Tbsp, and a Tbsp or so of sugar, and enough flour to make a sort of mud. Then you beat the crap out of it. 200 strokes should give you a nice smooth bubbly mud, and the bubbles show that the yeast is having babies. Good!
 Cover it with a damp teatowel (or plastic wrap) to keep bugs and cool breezes out and let sit. I gave mine a couple hours in a mid-60 room and this is what happened. Many bubbles. Many yeasty HEAs and epilogues.
 Stir down and add in the elements now that inhibit rising–salt, a good splash of olive oil, and I added in some cooked and cooled quinoa and rolled oats this time to up the protein. And then you add in flour. Lots of flour. Incidentally this is the method, if you just keep adding and adding flour, that is the “no-knead” technique. It’s a workout. But we’re going to knead.

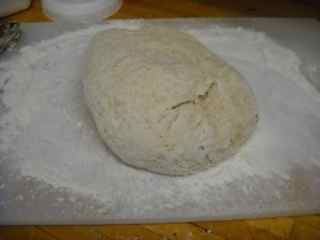 You dump it out onto your floured work surface and it’s a horrible sticky mess. (The black thing is a plastic tool for scraping out the bowl.) You knead in more flour. Your hands look like a zombie’s. (Go to youtube for lots of kneading demos.) I love this part of the process when the dough starts changing, becoming smooth and shiny. And you end up with this, on the right.

 At this point I abandon my nice ceramic bowl and use my dollar store plastic containers because it’s so much easier to assess the progress of the bread. You want it to double in size which will take a few hours. Slow rising = good flavor. But you don’t have to watch it. You can go write or read. And then, you meanie, you punch it down, which means you press it down with your knuckles (right) and let it rise all over again. You can skip this step; last night I pulled off a large chunk to make pizza (no pics, we ate it all).

 After it’s doubled again (or got pretty close) you punch it down once more and transfer it to your working surface. I’d decided to make mine cinnamon-walnut-raisin bread so I rolled it out and added those ingredients, and then folded it over and over to knead them into the dough.
 Here’s the dough shaped into loaves and put into my amazing French bread pan made by Chicago Metallic (this is an excellent site for bread porn, as is the King Arthur Flour site). It’s perforated which creates steam and a crunchy crust.
Cover it and let it rise some. I usually lose track of how long this takes. Preheat the oven to 400 degrees. You need a hot oven. You can put an egg-milk wash on your loaves if you like. You know when they’re done if they look like, well, bread, and have some color and sound hollow if you tap the bottom of the loaf. This is why it’s essential to invest in a high quality bread pan where you can tip the loaf out and examine it.
And here they are, all cooked and lovely:
 Yum!
Yum!
Tell me what you like to bake. Bread, cake, cookies? Try some bread and let me know how it turns out.
Love your commentary, Janet!
My dad worked in a watch tower for the forest service, many moons ago, and made sour dough biscuits from the starter he’d create when he first arrived, using it all summer long.
I love making bread. I used to own a bread machine and sold it, because I missed the kneading, the crackle and pop of the air bubbles, and feeling it turn from sticky to smooth. It’s also a great workout.
Chocolate chip cookies is my other favorite. It’s all much easier with the right tools.
I had a bread machine and I got rid of mine for the same reason–I like to get my hands in it, and the precision you needed for the ingredients drove me crazy. It also doubled my electric bill with daily use!
i like baking bread mmm!
i like the process of making sour dough – i like smelling / seeing the fermentation process.. loved your photos 🙂
GB
I want to go to any of your houses!!!! There’s nothing I like better than warm homemade bread! That said, I’ve never tried it, except in a bread machine which just wasn’t the same.
I love baking anything. Bread is a favorite. I often wish I had been able to get some starter from a couple of the bakeries in Colorado. Their sourdough was wonderful.
I don’t bake often because I’ll eat it. Warm bread with butter is just too tempting. Kneading the dough is always good therapy.